MMA MAG Help & Documentation
Installation
- Make sure that you have the latest version of WordPress installed.
- Upload the MMA-MAG theme to WordPress in one of two different ways- Extract the MMAmag-theme.zip and upload the ‘MMAmag’ folder to the /wp-content/themes/ directory on your server.- Or go to Appearance > Themes and click on the Install Themes tab at the top. Then click Upload and select MMAmag-theme.zip and click Install Now.
- After you upload the theme, activate it by going to Appearance > Themes and click Activate underneath the MMA-MAG screenshot.
XML DATA
MMA-MAG comes with a plethora of custom theme Options that allow you to play with the design and the layout without touching the code. To edit the Theme Options, go to Appearance>Customize.
Site Title, Tagline, Copyright Text and Site Icon
This is where you set your site title, the tagline and the copyright text in the footer along with the ‘Site Icon’. The site icon will appear as your favicon, mobile device bookmark icon, etc… Pretty much self explanatory.
Logo Options
This is where you upload your main logo, and the footer logo. Additionaly you can upload a ‘Facebook Homepage Image’ which will be displayed when someone shares your homepage on Facebook. The Logo image should be 307×140 PNG image. The favicon should be 16×16 PNG/GIF image, and the Facebook image should be 486×254 in size.
Colors
The colors menu. From here you have control over the color pallete on your site. At first sight it might seem that there are lots of colors to set up, but eventually you want to have as much contorol as you can over the color aspect of your site. Hence, we decided to give you as much flexibilty as we could.
– Top Posts Title Color: Select the color of the post titles in the header.
– Top Posts Category Color: Select the color of the category of the post titles in the header.
– Top Posts Background Color: Select the color of the background for the post titles in the header.
– Menu Background Color: This is where you change the color for the header background.
– Menu Hover Color: Use this option to change the color of the menu items when users hover over them.
– Menu Font Color: Select the color for the font in the menu.
– Super Slider Overlay Color: This is where you change the color gradient on the Super Slider widget.
– Super Slider Title Color: This is where you change the color of the title font on the Super Slider widget.
– Main Color: This is the main color. All the things that stand out, like the logo background, the small details like the colors of the category, links, etc…
– Widget Background 1: This is the more prominent one of the 2 widget background colors we offer. Great for creating similar shades of colors on the rankings, tables, etc.
– Widget Background 2: This is the less present background color for the widgets, but still important nonetheless. Feel free to experiment.
– Widget Text Color: This color is for the text on the widgets, usually the titles of events, posts, fighters, etc.
– Popular Background (category page): This determines the background to the popular posts thta are present on the category pages.
– Popular Text Color (category page): This determines the color of the text on the popular section.
– Popular ‘read more’ Color (category page): This determines the color of the clickable link usualy named ‘read more’.
– Background Color: This is the color for the background of the site.
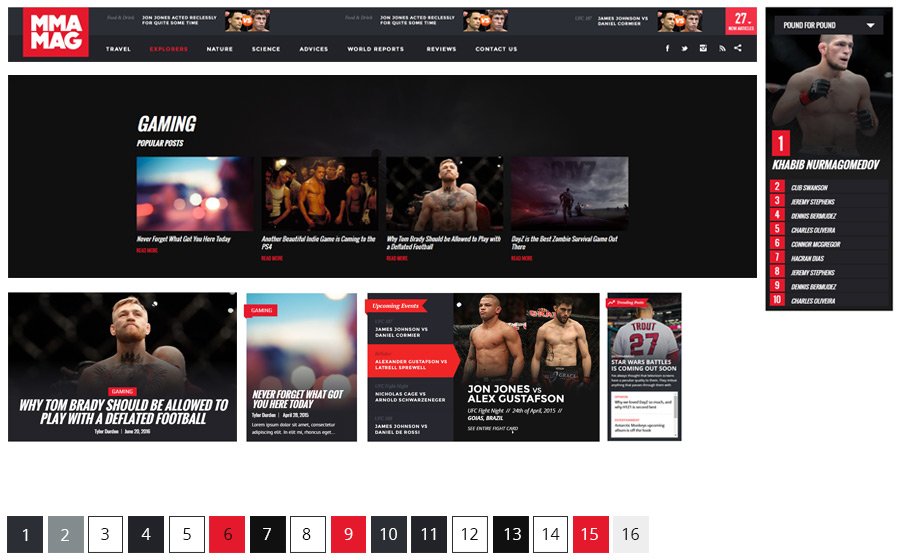
The image below presents how most of the site looks like with the demo colors. On the bottom of the image you can see each color we have selected for each of the 16 color slots, to get that demo look.
Design
– Body Width: This is where you select the width of the site basically. There are 4 options, 1903px(full width), 1596px, 1290px and 1100px. One thing to remember note is, if you change the size of the body width from smaller to bigger, and you already have uploaded the images before, than you will need to reupload them with proper size, or sue the regenerate thumbnails plugin.
– Slider Transition: You have a couple of slider loading effects(slider transitions) to choose from.
– Image Effect: This option changes the effect that appears when users hover over the images on your site. You can select one out of the 5 options available.
– Sticky Menu: Here you can trun on or off the option for the menu, whether you want it follow the user when he is scrolling down, or not.
– Widget Load Effect: Here you select the way that widgets load up when they gat into the viewport. There are 10 options you can choose from.
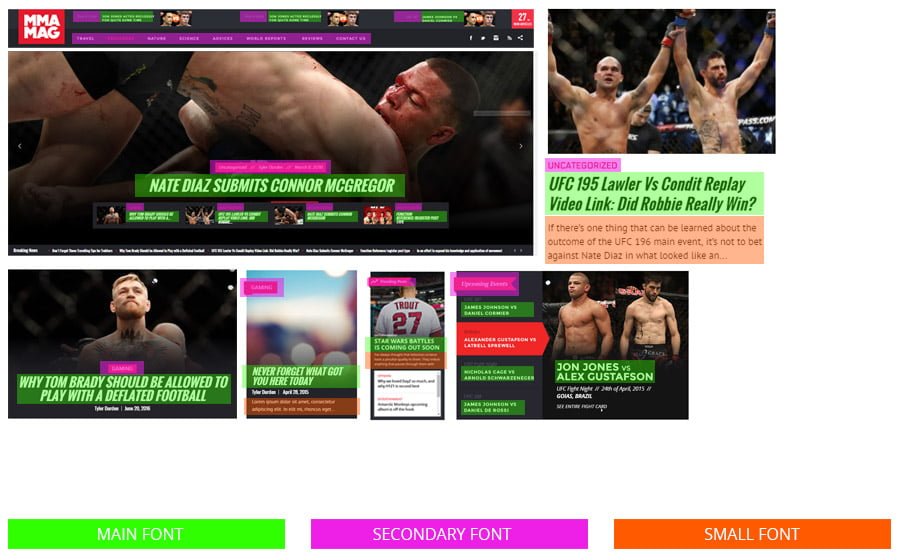
Typography
– Main Font: This is where you select the font for your site. The main font is present all throughout the site.
– Secondary Font: This is the secondary font of the site. It usually represents the smaller important elements, like the categories, tags, authors, etc. Also, this is the font of the menu.
– Small Font: This is where you select the font for your site. The main font is present all throughout the site.
– Menu Font Weight: This is where you determine the font wieght for the menu. You can select regular font, semi-bold and bold.
– Menu Font Size: Here you can select the size of the menu font.
– Widget Title Font Weight: This is where you change the font for the widget titles only.
– Featured Title Style: Here you can select the size of the menu font.
– Post Page Font Size: Here you can select the size of the menu font.
Header Posts
– Header Posts Type: This determines what type of posts should the top 3 posts in the header be.
– Header Posts Category: If you selected regular posts, then this is where you determine what category should those posts be. Also you can make the latest 3 posts appear by selecting ‘Latest’.
– Header Events Arrangement: If you selected Evets for the top 3 posts, this is where you determine what events should be visible. You can have the latest or upcoming events displayed.
– Header Dropdown Posts Visibility: This toggles on/off the Dropdown posts in the header.
– Header Dropdown Posts: Here you can set up what the dropdown posts should be. Similar to the ‘Header Post Type’ option above, you can select regular posts or events.
– Header Dropdown Posts Time Interval: This determines the time period taken into account when displaying the posts. You can have it set weekly. monthly, yearly,etc..
– Header Dropdown Date Visibility: Toggle on or off the visibility of the posts date in the header dropdown section.
– Header Dropdown Category Visibility: Toggle on or off the visibility of the posts category in the header dropdown section.
– Header Dropdown Author Visibility: Toggle on or off the visibility of the posts author in the header dropdown section.
Post Page Options
– Like the title suggests, here you have the options for the post page. You basically can decide whether to show or hide the social buttons, tags, comments and navigation links (next/prev post), etc. Also here you determine whether the title of the post page should be uppercase or not, whether the text should star with drop caps and similar options. Another thing you can do here is to select what the related posts on the bottom of the page are determined by. You can select related posts by category, tags or author.
Category & TV Page Options
– This is all about the category and TV pages. Here you determine how many posts should be visible per category page, whether the category page itself should start with a big image, displaying that month/week/day’s 4 most popular articles, and what type of blogroll style should portray the remainig posts on the page. You can also select whather the category page should display at the bottom of the page, another set of popular posts, and if so for what period of time. You can also select the popular posts from last week, last month or forever. As for the Tv page here you select the widget style that displays the video posts under the main video. You can select one out of 3 styles.
Translate
– If your websites language is not English, this is where you set up the translation. There are a few words throughout the site like read more, search, share, etc.. that you might want to translate to your language. This is where you do it.
Social Settings
– This is where you fill in your social accounts. Just type your username/handle under the appropriate social media platform, and the rest will take care of itself.
Tracking
– This helps you keep track of statistics. Simply copy and paste the code from google analytics(or any other) to the appropriate field and youll be ready to view your visitor statistics.
Background Image
– If you don’t want a solid color for a background, you can upload an image. Be it a nice landscape, a cool city skyline or a subtle pattern, here is where you do it.
Menus
– MMA-MAG has predefined space for you to place 2 menus. Here you choose where to display the menus you have created. See the screenshot below for reference. Select which menu appears in each location. You can edit your menu content on the Menus screen in the Appearance section. For more information on how to use the WordPress custom menu feature, click here. (http://codex.wordpress.org/Appearance_Menus_Screen)
Widgets and Widget Areas
MMA-MAG comes packed with 2 custom widgets you can use almost everywhere. Basically every widget fits in every area, depending on what size you select for it, so you are free to experiment. To activate a widget, go to Appearance > Widgets and drag and drop a widget from the Available Widgets box to the widget areas. Or you can do the same by going to Appearance>Customize where you can see the widgets area at the bottom of the menu. This way you can see the widgets in the live preview right away.
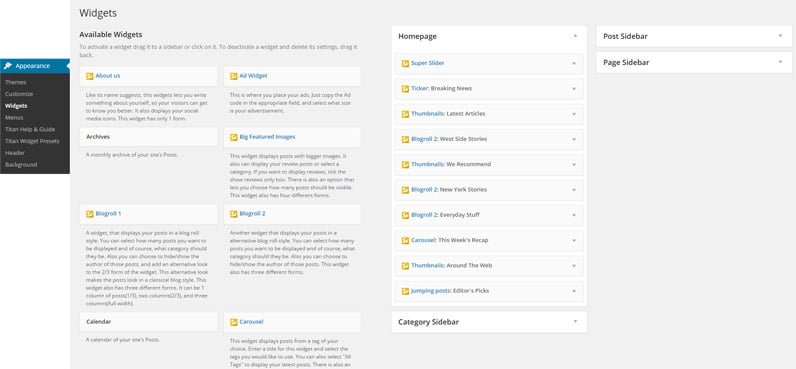
Widget Descriptions
Like we mentioned before, you can place almost any widget anywhere. Feel free experimenting with your layout, or use one of the suggested layouts we have already made. Remember almost every widget can have different width like shown in the example below. By using the widgets like lego blocks, that’s how you basically build your site with MMA-MAG
This is how that looks like live:
– Super Slider
The super slider displays 1 post at a time. This widget has 2 forms, you can select either full width, or the width of the body. Also You can specify how many slides should the widget display. /p>
– Slider
This is the typical slider widget. It displays posts based on categories. You can also select if the control thumbs are visible on the slider, or rather use the arrows as a navigation.
– MMA Events
– This is the first of the MMA specific widgets in the theme. The MMA Events widget lets you display the latest or upcoming events that you have created. It can assume assume any of the 4 different widths.
– MMA Results
– Another MMA specific widget. This one displays the results from the latest events and fights you have created. Let the fans know what whent down in the latest MMA event.
– MMA Rankings
– Another MMA widget, this one displays the rankings of the fighters. It can display several different categories of fighters.
– Carousel Widget
This widget displays posts from a category of your choice. Enter a title for this widget and select the category you would like to use. You can also select “All Categories” to display the latest posts from your site. There is also an option that lets you choose how many posts you would like to display, and if you would like the author of those posts to be visible.
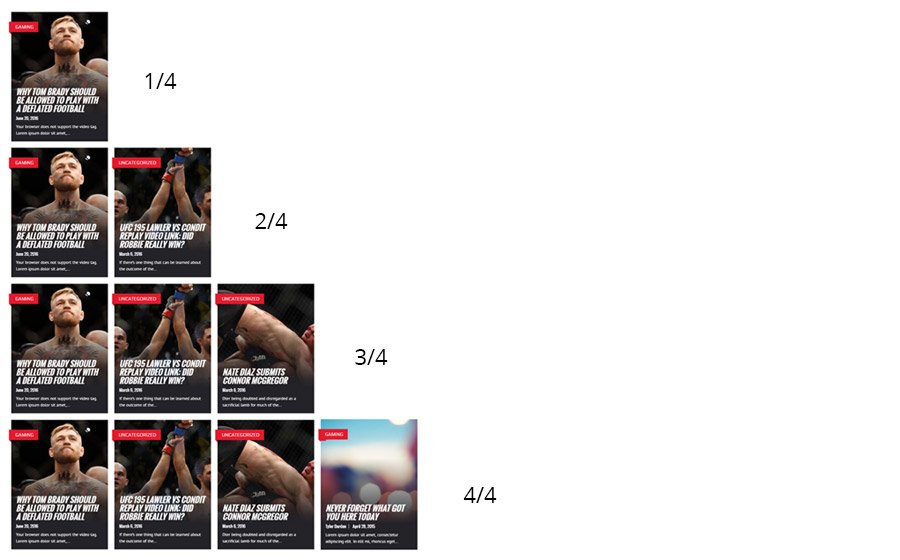
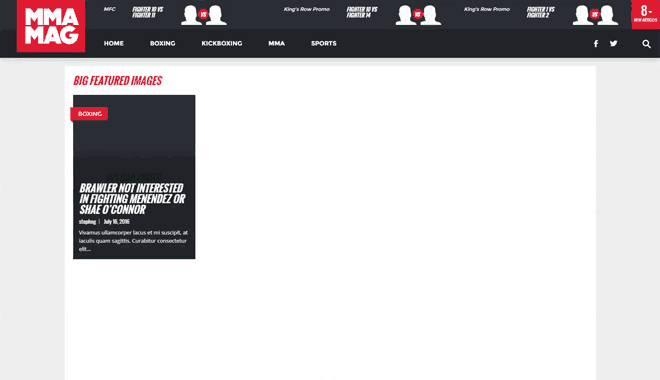
– Big Featured Images
This widget displays posts with bigger images. It also can display your review posts only or select one of the categories. If you want to display reviews, tick the ‘filter reviews’ box. There is also an option that lets you choose how many posts should be visible. And the option to decide if you want the authors, the date and text excerpts of the posts to be visible.
– Huge Featured Images
This widget displays posts with even bigger images. Each post displayed in this widgets takes 2/4 of the body, thus it only comes in 2/4 or 4/4 widths. It also can display your review posts only or select one of the categories. If you want to display reviews, tick the ‘filter reviews’ box. There is also an option that lets you choose how many posts should be visible. And the option to decide if you want the author and the date of the posts to be visible.
– Shortcode Widget and Row Holder
This is a widget that lets you paste the shortcodes that you want to use on the theme. You can select the size of it, thus making sure that it does not mess up the layout. Additionaly you can use this widget to straighten the widgets. For example if you want your widgets be aligned, but an pocket of empty space created by the widgets above does not allow the widgets to align, you use this widget empty, select it’s size and it will act like an invisble line that will keep the widgets below it aligned.
– Ticker
This is a typical ticker widget that displays breaking news, or any category that you select for it. It can be full width, or the width of the body maiking it perfect for you to combine with other widgets. You can also add a small sign, or word, that will separate the posts.
– Blogroll 1
A typical blog posts widget, that displays your posts in a blog roll. You can select how many posts you want to be displayed and of course, what category should they be. Also the lenght of the excerpt is determined by you, and the visibility of the authors and date.
– Blogroll 2
Another widget that displays posts in a blog style, only with much bigger images. You have the same options as the previous Blogroll 1 widget, like the visibility of the author,date and the number of posts it should display.
– Small Featured Images
This widget displays a certain category of your choosing, and you have the option to select the visibilty of the author, and date. Also you can select how many posts are displayed, and the option to filter only the reviews.
– TV-Ajax-Widget
Same as the previous Tv-Widget, only this one displays the videos directly. Meaning that when you click on it the video plays right away, rather than taking you to the video post page. It also sports a carousel, so the user can easily select from the latest videos you have uploaded.
– Trending Posts
A simple widget that displays the most popular/visited posts on your site. You can also set up the number of posts displayed.
– Newsroll
A simple widget that displays the latest posts on your site. You can also set up the number of posts it should display.
– Social Widget
This widget displays your social media. Depending on what social media you want to set up, you would need to enter the handle, key, ID, etc.. This widget has 2 forms, you can change it by selecting the vertical, or horizontal layout.
– Thumbnails
Just like the previous widget, it displays the latest posts from a category or the latest posts in general. The difference being that these posts are displayed with small thumbs. You can set how many of them should be visible.
– About Us Widget
Like its name suggests, this widgets lets you write something about yourself, so your visitors can get to know you better.
– Ad Widget
This is where you place your ads. Just copy the Ad code in the appropriate field, or paste the image url and where it should link to and you have the ad ready.
– Video Widget
This widget displays a video that can be played directly on the homepage, or where ever you place it. Just add a link to the video and thats it.
MMA Fighters
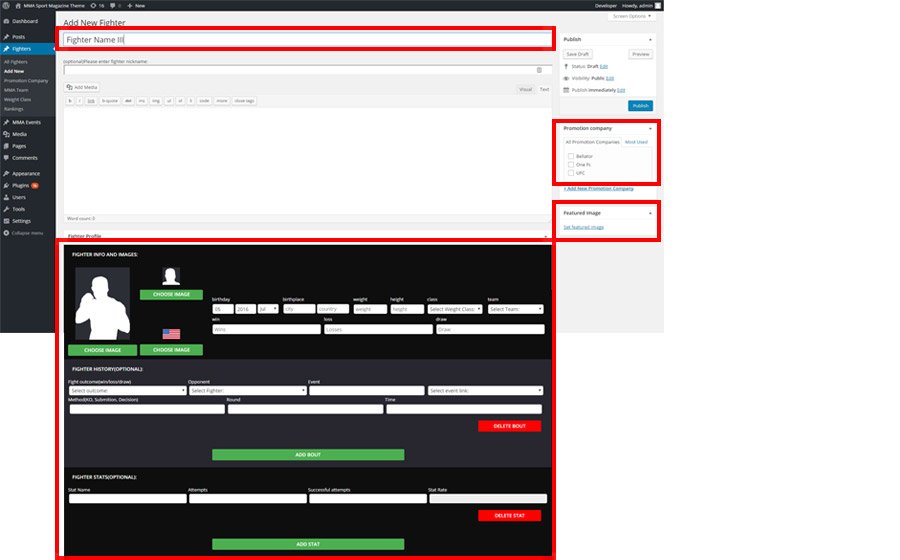
MMA-MAG lets you create fighters along with details about them, like their height, weight, where they come from etc… To create a fighter go to Fighter>Add New and then for the title, write down the fighters name. The featured image you upload for the figher will be the main image that can be seen when landing on the fighter page. The rest of the image you need to upload can be found below the content area. You can upload a small ‘face’ image for the fighter and a bigger one ‘body’ image. Depending on where the fighter is displayed the appropriate image will be shown. Apart from the images, you can add information about the fighters origin, his height, wight, statistics, wins and losses. You can even add recent ‘Bouts’ (fights) for the said fighter and even link directly to events on your site. Under the ‘Fighters’ section you can also create Promotion Companies like Bellator or UFC that the events will be under, and teams like American Top Team to which you can assign fighters.
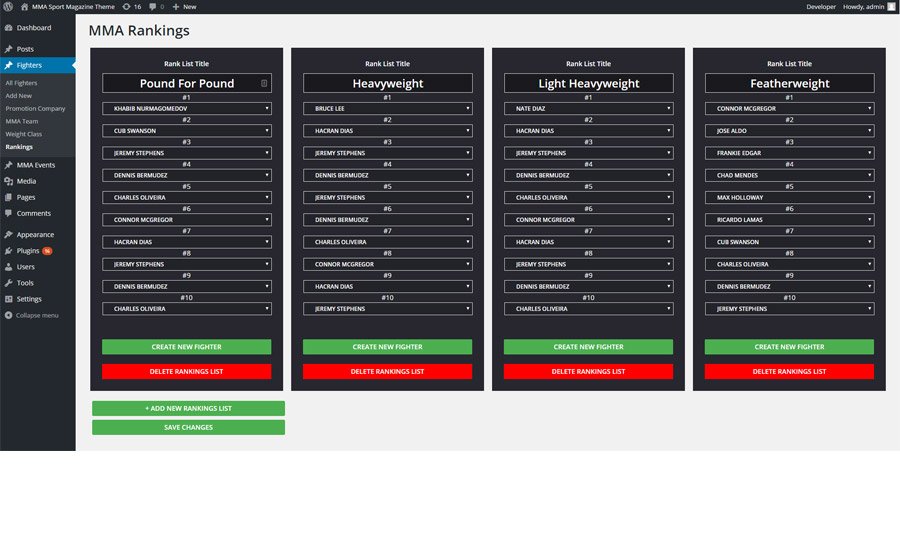
MMA Rankings
MMA-MAG would not be the theme it is, if it did not allow it’s users to create the famous fighter rankings. We all know people think differently about who the greatest is, so why not hear them out and make up your own mind. Create the rankings like you think they should be. Or listen to what your visitors say, and place the fighters in the order they demand.
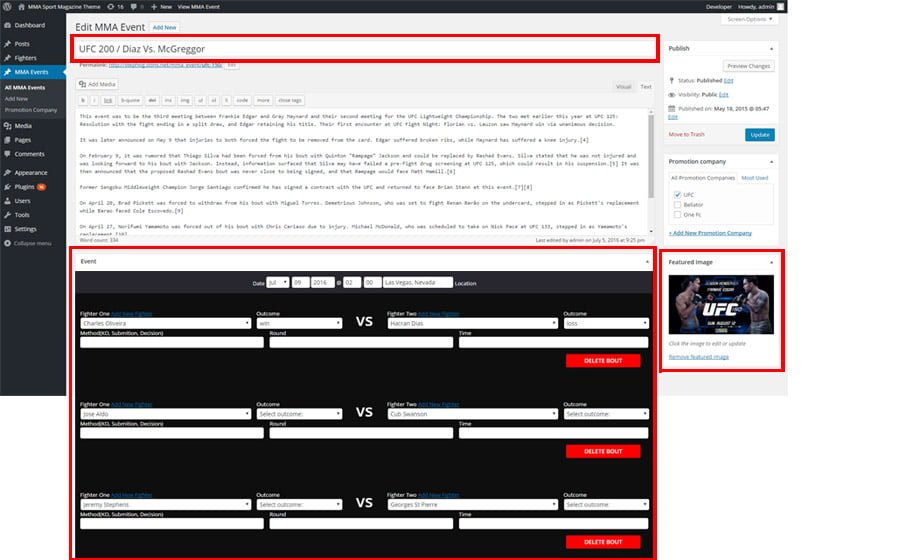
MMA Events
To Round off the MMA side of the theme we have created the Events section. This is where you set up the events. You can have them as ‘Upcoming Events’ or you can have them as events that have already happened. Either way, when creating an event, you need to have fighters ready to assign to the bouts(fights). Also you can upload a featured image for that event, and also give out some info such as the locations, city and date/time of the event. If an event it ‘upcoming’ an appropriate timer will be visible on the event page counting down the minutes till the big night.
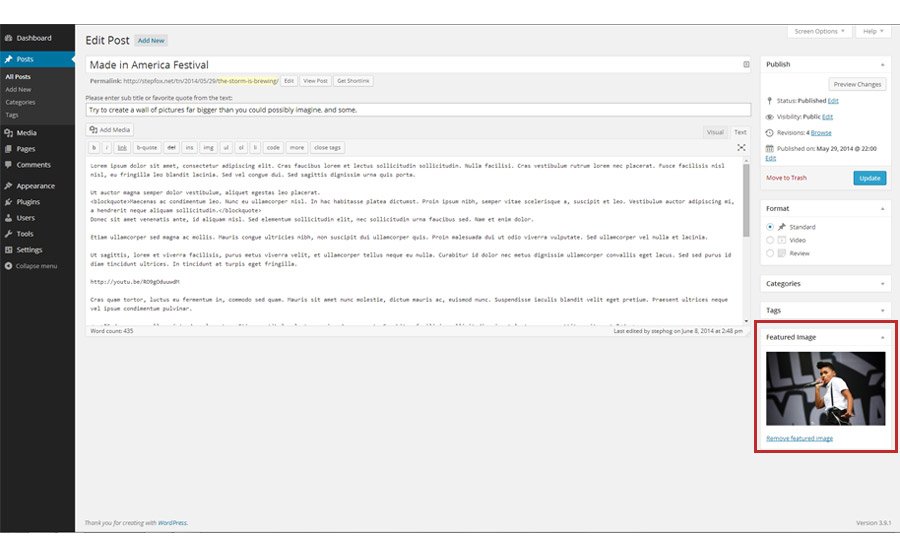
Images
MMA-MAG uses WordPress’ built-in featured image feature to handle image management. The recommended size for images to show properly on the site is 940×560. However, it all depends on whether you use the full width option for the post page fatured image, and/or the fullwidth body size. If so, you will need to upload bigger images than that. To set the featured image for a post, go to Posts > Add New (or edit an existing post) and click the set featured image in the featured image box. If the desired image is not already uploaded simply click on upload image and then select one and click set as featured image. MMA-MAG theme will take care of the rest in generating the smaller thumbnails that show up in the various places around the site.
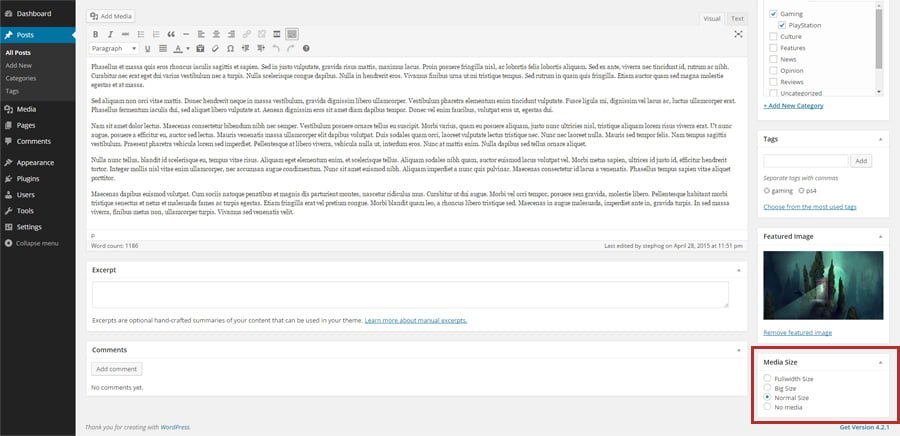
Media Size
MMA-MAG lets you choose from a couple of options, what size should the featured image should be. You can select between full width, body width, normal and no media. Depending on what have you selected make sure you upload image with proper size.
Videos
MMA-MAG uses WordPress’ built-in featured video feature for easy video management. When creating a post, select ‘video’ under ‘format’ options and then simply copy the video link and paste it in the Featured Video area. MMA-MAG will take care of the rest and your video will automatically appear on the video page as well. The video page is basically a page containing all the videos in your articles so far, in a nice layout which makes it easier to browse them and also more enjoyable to watch. To have the Video(TV) Page, make sure that when you go to Appearance>Menus, in the right corner of the screen, under ‘Screen Options’ you have ticked the format box. Then just add the Video format to the menu.

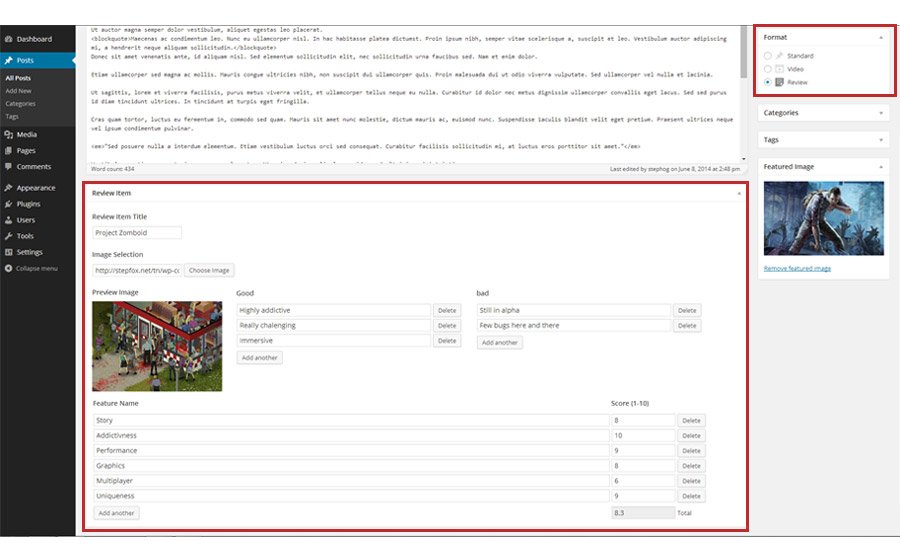
Reviews
Its really easy to set up a review post. Just like the video post, all you need to do is, select review from the format options on your post page. Once you do that, new options will appear under the text area. Here you can upload the image and give the name of the subject your are reviewing, and add a few short pros and cons to it (good and bad). Also here you add how many parameters the subject will be reviewed on, and what numbers it scores on each on it. The total amount of the scores will be summed up and shown over the image.
Gallery
With MMA-MAG it is really easy to set up a gallery page. All you have to do is select the gallery format on the right hand side, and then just upload the images in the new gallery field that opens up under the content area. And that’s about it.

THANK YOU VERY MUCH
Once again, thank you so much for purchasing this theme. As I said at the beginning, we’d be glad to help you if you have any questions relating to this theme. We’ll do our best to assist.
StepFox